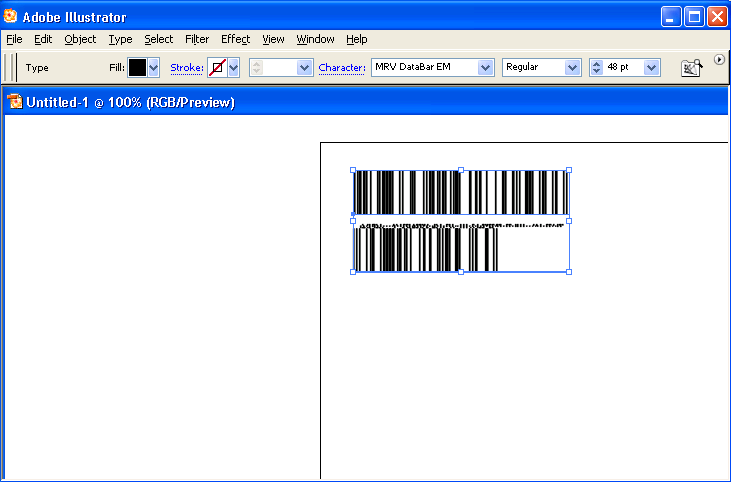
In Morovia DataBar Fontware’s manual, it explains how to overcome the line gap issues in several programs, such as Microsoft Visio. It did not mention Adobe Illustrator, which alos has the same issue.
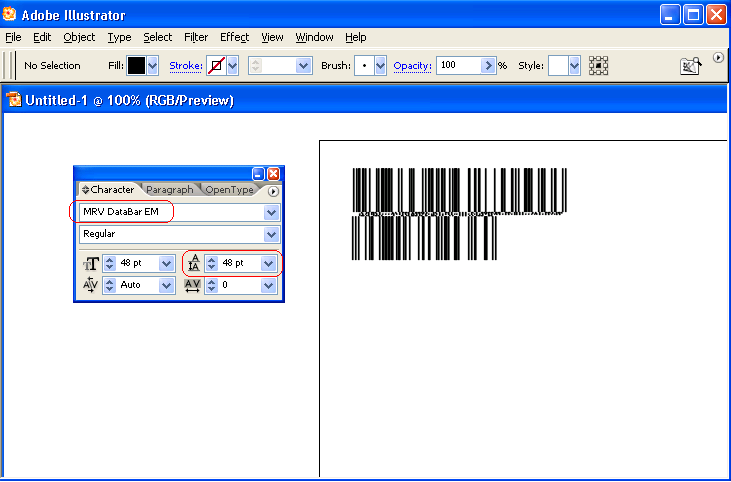
Adobe Illustrator does not present a menu item for you to adjust line height. That is at least what I found on my computer (Illustrator CS2). Instead, you have to press Ctrl+T to pop up the character palette, and make the line height the same as the font size you selected.
In the character palette, make sure that the line height is the same as the point size. The gap then disappears.
Conclusion - in Adobe illustrator you can adjust the line height. To do so, press CTRL+T to pop up character palette and change the line height to be the same as the font size.
You can now create barcode easily from your browser. Morovia has just announced the availability of Online Barcode Generator.
Again the address is http://www.morovia.com/free-online-barcode-generator/.
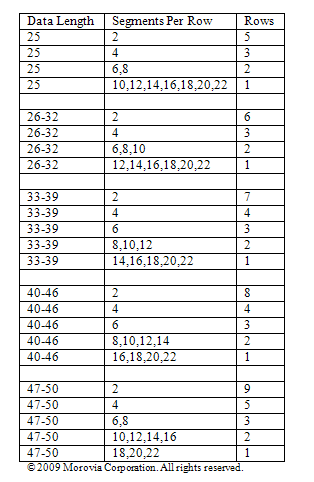
The new coupon code (AI 8110) is required to be printed in GS1 DataBar Expanded Stacked. Its data can be quite long. In fact the length is the longest we have ever seen in GS1-128 - from 25 to 39 digits. GS1 DataBar Expanded Stacked can have multiple rows, depending on the data and the value of SegmentPerRow. The value of SegmentsPerRow can be anywhere between 2 and 22. 22 also produces one-row barcode.
In some cases, it is desirable to find out the range of SegmentPerRow, based on the data encoded and the number of rows desired. For example, our coupon codes can be between 25 to 39 digits, but we want all barcodes created two rows.
To find out the relationship among the data length, segment per row and the number of rows in the barcode created, we wrote a simple perl program. It calls the encoder DLL included in Morovia DataBar Fontware to get the barcode string, then parses the string to find out how many rows in the result. It generates randomized data as input (based on DataBar Spec, it is not necessary as numeric data with the same length should always create the same length barcodes, all things being equal). It increases the number of digits one by one, and calculates using all possible SegmentsperRow values. Warning: if you are running the trial version, do not run this program - you will have to press OK button hundreds of times to complete the program (each call pops up a ‘trial notice’ message box).
We found that the results can be divided into five groups - 25 digits, 26-32, 33-39, 40-46 and 47-49. It seems that each segment encodes 6 digits. Note - the digits we talked here refer to the coupon code, not including the AI portion.
For small manufacturers with dedicated IT stuff, it is often a pain to write a trivial program. Numbers such as UPC-A, EAN-13, SCC-14, SSCC-18 and Bill of Lading (BLN) all require a modulo 10 check digit at the end. Although the algorithm is simple, it is easy to make mistaken if done by human. Fortunately you can now calculate check digits online using this free web utility. All you need is an Internet connection.
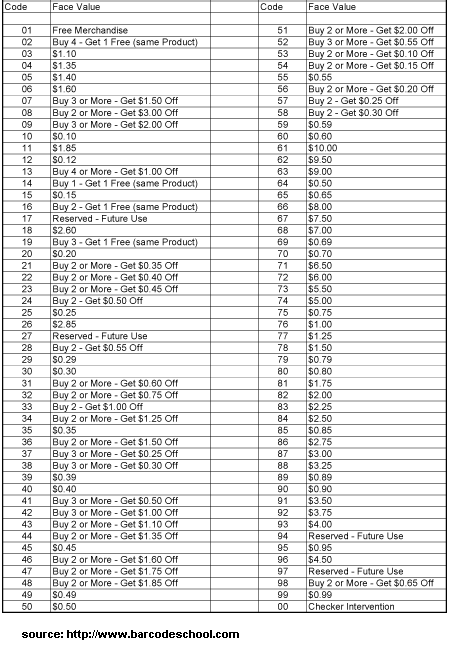
The value codes are the two digits before the last check digit. They have fixed meanings as defined by GS1 organization. The table below lists the meanings effective as of writing. Occasionally GS1 changed the meanings of some. Fortunately, The changes were rare and the last update happened in year 200.
Nowadays manufacturers and importers are required by retailers to supply shipping container labels affixed to the cartons shipped to their warehouses. While it is a reasonable requirement from a retailer’s perspective, it is a burden for a small manufacturer that does not possess an advanced IT system. Many manufacturers ship to several national retailers only, and it does not make sense to spend tens of thousands on a labeling system. Fortunately with Monterey Barcode Creator, you can create labels easily from Microsoft Word.
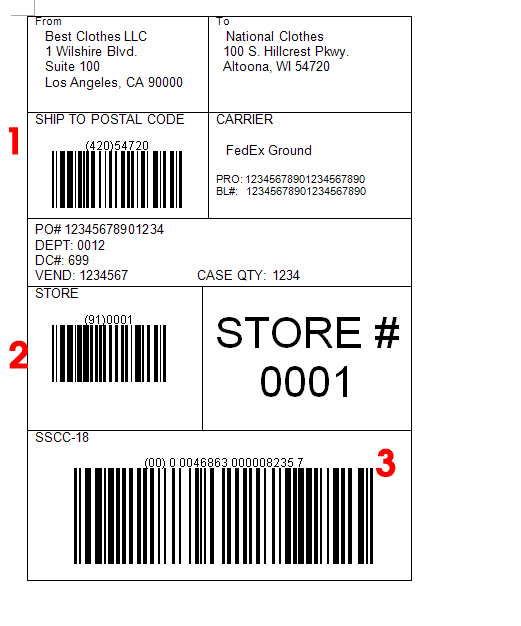
The image above shows a shipping label that meets the requirement of a national retailer. The whole label is 4″ X 6″. Most information in the label are quite obvious so we will not explain them here. The items that puzzle most are the three barcodes, required by the retailer for anyone doing business with. Those barcodes are actually not complicated as if they look at the first glance. All those barcodes are UCC/EAN-128 (also GS1-128) barcode. Their human readable texts all start with a number that is enclosed in parentheses. For example (420)54720. Here 54720 is the postal code, and 420 indicates that the data followed is a postal code.
Postal Code
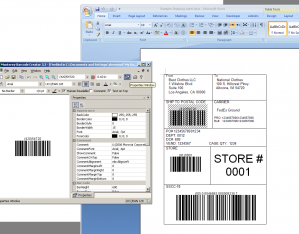
The top barcode encodes the postal code (or zip code, USPS code etc.) of the retailer warehouse. Open Monterey Barcode Creator, and select “UCC/EAN-128″ as the barcode type. Change property TextOnTop to true so that human readable text appears on the top of the barcode. Turn off the comment - we do not need it. Set BarHeight to 500 (as the barcode is 1/2″ tall), and NarrowBarWidth to 15 (15 mils, 0.015 inch). Enter text as exactly as the one in the image: (420) 54720. After that you should get the barcode shown on the screen.
Now drag the barcode and drop it into Microsoft Word. Occasionally some people do not understand “drag and drop”. Here is the process: first move your mouse cursor on the barcode. Press you left mouse button. While holding this button, move the mouse cursor into Microsoft Word (you have to make sure that the Word window is visible at the beginning). Release the mouse button. The barcode enters Microsoft Word.
Better thing is, next time when you create a barcode with different data encoded, you do not need to repeat the process. Double click on the barcode in Word, the Barcode Creator Window will appear. From there you can modify properties of the barcode. The changes automatically go back to Word.
Store#
The barcode in the middle encodes store number - 0001 in our case. The process is similiar, except that you enter (91)0001 instead.
SSCC-18
Now comes the most critical barcode - SSCC18. This number and barcode are vital to the whole label, and you must proceed careful. If you are not familiar with this term, read this page first.
This number is used throughout the supply chain. It is not just for the shipment between you and the retailer’ warehouse. After the box is received, it will be delivered to regional warehouses, and front stores. The number identifies the box in all the process.
The number has three parts: (1) package type (the first digit). For cartons, it is 0. For pallets, it is 1. (2) Your GS1 number. (3) Serial number. The total length of (2) and (3) must be exact 16 digits. So if your GS1 number has 10 digits, you have 6 digits for the serial number. Lastly, the serial number must not repeat itself within one year period. It is your responsibility - recording it to a log is a good idea here. The last digit is the check digit, which is calculated based on the first 17 digits. You do not need to calculate manually, you can use the free utility here.
This bar code is usually bigger than other barcodes because of its importance. In the example labe, we use 20 as NarrowBarWidth, and 1000 as BarHeight. That means the barcode will have X dimension at 20 mils and the height is 1 inch.
If your shipping labels look similiar to the image above, you can simply download this file and modify by yourself. Note that you must have Monterey Barcode Creator 3.3 or above installed (trial is OK, but there is a watermark on the image) before you can change the barcodes.
Morovia Corporation is pleased to announce the General Availability of a new barcode font package that supports the GS1 Databar family of barcodes. Morovia DataBar Fontware is a font-based solution to print GS1 DataBar symbols. DataBar, formerly known as Reduced Space Symbology (RSS), is a GS1-endorsed solution to encode 14-digit GTIN numbers alongside other complementary information, such as sell by date and price. There are seven types of DataBar formats - GS1 DataBar, GS1 DataBar Truncated, GS1 DataBar Limited, GS1 DataBar Stacked and GS1 DataBar Stacked Omnidirectional. Morovia DataBar Fontware supports all of them. It also supports creating Code128 and EAN-128 (also referred as GS-128) barcodes.
The release of the font package is in line with the GS1 mandate for all trade-item scanning systems to achieve the capability to read GS1 DataBar bar codes and GS1 Application Identifier System by January 1, 2010. This is also known as the GS1 global sunrise date.
This package includes the following contents:
* Two true type fonts targeting 300/600 dpi laser printers as well as 203-dpi barcode printers/fax machines - mrvdatabar-13x.ttf and mrvdatabar-34x.ttf.
* Two true type fonts targeting screen resolution: mrvdatabar-13x-96dpi.ttf and mrvdatabar-34x-96dpi.ttf.
* A special designed true type font, mrvdatabar-em.ttf to be used to create stacked symbols in some software that does not handle font height properly.
* The user reference manual, in both PDF and HTML format.
* The PCL package includes two PCL scalable fonts, mrvdatabar-13x.sft and mrvdatabar-34x.sft, as well as test file to work on Windows and Linux.
* DataBar Encoder GUI, a GUI program to create barcode strings based on data entered.
* A Windows native DLL that provides standard API that provides encoding functions to Microsoft Office programs, as well as programming environments that support calling DLL.
* A Crystal Reports extension DLL that adds DataBar printing functionality to Crystal Reports.
All files are packaged in a single zip file. The root directory contains the installer for Windows operating system. The PCL directory contains the font files and test files for work on PCL printers.
For more information, see http://www.morovia.com/font/databar.asp.
This article we’ll talk about how you can make a UPC coupon. Desipte the efforts from GS1 to replace it with more advanced solutions, U.P.C. coupons are still the most common type all over North America.
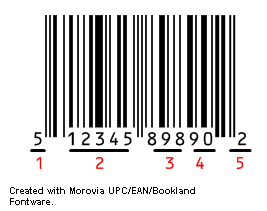
A U.P.C coupon look like a regular UPC-A barcode except that the first digit is always 5.
A coupon number consists of five parts, as illustrated in the barcode.
UCC Prefix
The first digit of a UPC-A number is called UCC prefix, which identifies the type of the product. It is also called Number System, or GS1 company prefix (UCC has changed its name to GS1, and is now renaming everything UCC to GS1). This digit signals to the POS system that it is canning a coupon, not a regular UPC code.
UCC Company Number
The following five digits identifies the manufacturer of the couponed item. This number must be the same as on the products being couponed.
What about if your company number assigned is longer than 6-digits? You would only use positions 2-6 for the Company Prefix on the coupon. The reamaining digits would be dropped.
Family Code
The following three digits is Family Code. This code designates items being couponed. Products being couponed must be assigned a family code. In order to the retailers to validte coupons, this family code must be communciated to retailers before the coupons are issued.
Family code applies on a group of products. There are 1,000 family code numbers (000-999). However, GS1 reserves the two ranges 001-009, 990-999. You should not use the these ranges.
Value Code
The two digits defines the value of the coupon. Value codes are predefined. For example, code 05 means $1.40 off, and 13 means “buy 4 or more and get $1.00 off”. For the detailed list, obtain the manual titled The Application Standard for UCC Coupon Codes from GS1. You can also find it here.
Check Digit
The last digit is the checksum, the same as all UPC-A numbers. You can calculate check digits at http://www.morovia.com/education/utility/upc-ean.asp.
As you can see, U.P.C. coupon is quite simple but not flexible enough to deal many special requirements. As demans for a better coupon format grows, GS1 has proposed several extended formats, and we’ll explain them in the next article.
How to Create U.P.C Coupon
Morovia provide a font-based solution called
Morovia UPC/EAN/Bookland Fontware, and an image-based solution Monterey Barcode Creator. Both have trial versions and can be downloaded immediately after the purchase. Try them today!.


